Tuesday, May 31, 2011

Deep South Eats: Crunch Romaine Salad


It is recipe week here on Deep South Sweets. All recipes. Every day. I have some of my household favorites to share with you as well as a new recipe or two. 


This salad is another "staple salad". You don't come to many parties at my house without finding this salad on the menu. Girls love it, guys love it, kids love it, baby's love it (oops too far). I recommend doubling the lettuce mix for crowds of 8 (don't double the dressing as it makes ample).  It is a magical salad and tends to disappear before your eyes.


Ingredients:

  • 1 large head of romaine lettuce (I usually use one bag of hearts of romaine - can also sub spinach)
  • 4 green onions, sliced
  • 1 pkg Ramen noodles (doesn't matter what flavor as you are only using the noodles not the seasons)
  • 1 cup chopped walnuts
  • 1 cup vegetable oil
  • 1/2 cup red wine vinegar
  • 3/4 to 1 cup of sugar (depends on how sweet you want - I like 3/4)
  • 3 teaspoons of soy sauce
  • salt and pepper to taste
Directions:
  • In a large salad bowl, break lettuce into small bite size pieces and toss with green onions slices. Prepare ahead of time and refrigerate together.
  • Break the Ramen noodles into bite size pieces and combine with walnuts. Toast on the stove top or oven until evenly browned. You can toast them in 4 Tablespoons of butter if your prefer but it really isn't necessary. Once toasted set aside to cool.
  • Blend oil, red wine vinegar, sugar, soy sauce, and salt and pepper together by blender or whisk. Chill in refrigerator.
  • At serving time, toss greens, noodle/nut mixture, and at least 1 cup of dressing.
Original recipe from my church cookbook.

I have Island Chicken marinating in my fridge for dinner tonight - can't wait!

blog signature - 4/2011

Monday, May 30, 2011

The Sweet Kitchen: What's on the Menu Memorial Day Style


What is cooking on your grill this weekend?

Here at the Deep South Sweets house we are having a little impromtu get-together with friends.

Bring Your Own Meat Steaks on the Grill
Zesty Grilled Corn
Crunch Romaine Salad
Pound Cake
(affectionately referred to as Belle's 1st Birthday Cake)

This week is dedicated to recipes, so starting tomorrow look forward to a recipe a day until next Monday.
blog signature - 4/2011

Saturday, May 28, 2011

Saturday Sweets: Pancake Breakfast


Now that my dear husband is off to polo practice every Saturday morning, 
my little nut and I have made the tradition of making pancakes together. 
 She loves the measuring and mixing, 
and together we make memories!

blog signature - 4/2011

Thursday, May 26, 2011

Deep South Eats: Creamy Chicken Taquitos


Ohmahgoohness. These are so good and oh so simple. After seeing this Creamy Chicken Taquito recipe in several places I knew it was time for me to give them a try. They made for a perfect weeknight meal accompanied with a simple green salad with a catalina dressing and a side of black beans. I will have to admit that they don't reheat well, but I could see these being fantastic frozen before baking.


Ingredients:


  • 3 oz cream cheese
  • 1/4 cup of salsa (original recipe calls for green but all I had on hand was the tomato based)
  • 1 Tbsp fresh lime juice
  • 1 tsp chili powder
  • 1/2 tsp cumin
  • 1/2 tsp onion powder
  • 2 cloves of garlic, minced
  • 3 Tbsp chopped cilantro (optional - I omitted since cilantro is not my best friend)
  • 2 sliced green onions
  • 2 cups of shredded cooked chicken
  • 1 cup of shredded Mexican blend cheese
  • 10-12 6-inch flour tortillas
  • Cooking spray
  • Kosher Salt
Directions:
  • Preheat oven to 425 degrees and line baking sheet with parchment paper or silicone mat.
  • In a large mixing bowl, combine cream cheese, salsa, lime juice, spices, garlic, cilantro, green onions, chicken and shredded cheese. Mix until well combined.
  • Heat the tortillas a 4-6 at a time for 20-30 seconds in microwave to soften.
  • Spoon 2-3 Tablespoons of filling down the middle of the tortilla. Roll tightly around the filling and place seam side down on baking sheet. Repeat with remaining tortillas and evenly spacing filled taquitos on baking sheet.
  • Spray the tops of the taquitos lightly with cooking spray and sprinkle with a pinch of kosher salt. The salt really adds to the overall flavor and texture so don't skip this step.
  • Bake 15-20 minutes until crisp and golden brown. If you prefer to freeze them, transfer baking sheet to freezer and chill for 30-60 minutes. Transfer frozen taquitos to freezer safe container or plastic bag. When ready to bake from freezer add a few minutes to baking time and bake until filling is warmed through. Serve with sour cream and salsa.
Recipe found at Annie's Eats with original from Our Best Bites.

blog signature - 4/2011

Thursday, May 19, 2011

Deep South Home: Feeling Inspired

So I finally broke down and sorted through the GIGANTIC stack of catalogs that has been taking up residence on my kitchen counter. Some of the catalogs didn't even make it through the first round of cuts and were sent straight to recycling. Others were honored with a mere flipping of pages prior to their eventual doom of the recycling bin, but some had pages torn out and stole a little piece of my inspiration heart.


Without further ado... the finalists are...


Stripe Edge Sheet Set
How precious is this Stripe-Edge Sheet Set from West Elm? I know I totally have a obsession with all things grey right now but I love the simplicity of these sheets while remaining very unique.

Stripe Shower Curtain

This Stripe Shower Curtain (also from West Elm) would look awesome in my guest room bath. The shower area is void of good lighting and the white stripes would really brighten up the small space.

Wood Tray, 18"x28", Silver
I would love this Butler Tray and Stand from West Elm for my living room. The silver lacquer finish would really tie-in the silver coffee table (I have yet to finish) and be great between two arm chairs for resting drinks.

Yorkshire Console Table
This Yorkshire Console Table from Grandin Road would be awesome for my back patio. On a day-to-day basis it could hold tubs with my little nuts outdoor toys and plantings of fresh herbs for cooking. When entertaining it would be a great set up for a appetizers and drinks or a little backyard barbecue buffet.

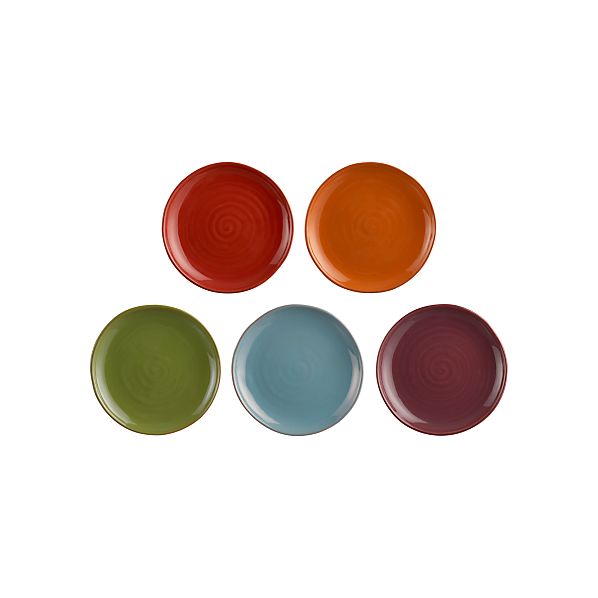
CopaAppPlatesS11
Speaking of appetizers...I love the bright teal in these Copa Dinnerware Appetizer Plates from Crate and Barrel. I am the queen of sticking with basic white or cream dinnerware and then adding accent pieces for punch. Colorful or patterned appetizer plates are a great way to spice up your everyday dinnerware for parties.

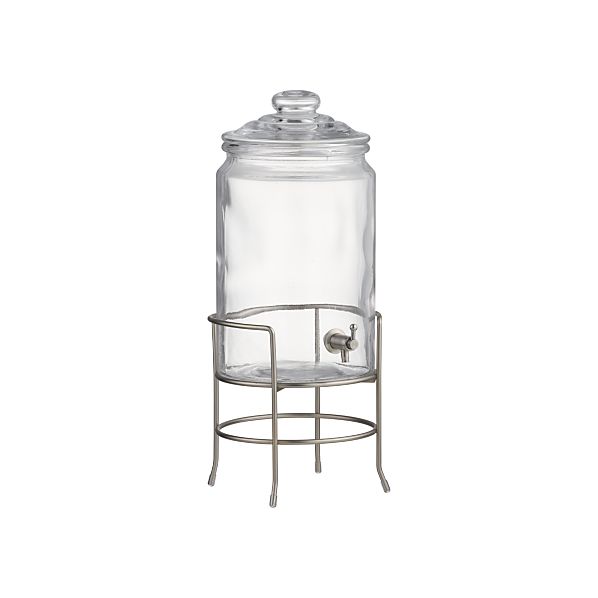
ColdBevJarNStandF10R
I know that beverage jars like this are really popular right now, but let me tell you what is SO nice about this is that the spigot is metal as opposed to plastic. Meaning that this Cold Beverage Jar and Stand from Crate and Barrel is highly unlikely to break off at the spigot when guests are trying to get a drink (which has totally happened at a party of mine before - and it may have been a borrowed beverage jar).
Ballard Indoor/Outdoor Curtains
Lastly, but truly not least, I have had my eye on these Indoor/Outdoor Drapes from Ballard Designs since last summer. Our breakfast room looks out on our patio which looks directly at our neighbors patio (zero lot lines with no fence). Putting up shutters or blinds in the breakfast room would really take away so much natural sunlight that our downstairs receives. Outdoor drapes across the patio would provide privacy and a little glam to our outdoors. While my heart is in love with the "spa" color, my realistic side knows that the "sand" would blend in better with the exterior of our house.

Just a few things that have caught my eye lately. What has caught your eye, caused you to dog ear or a page or even pin to pinterest? I would love to hear what you are "loving" right now.

Please note that I am not advertising for West Elm, Crate and Barrel, or Ballard Designs. While they might like the know me for my cinnamon rolls (you know a friends with benefits situation) they simply know me for my shipping address and credit card number. I am reap no benefits from telling you the things I love!

blog signature - 4/2011

Wednesday, May 18, 2011

The Sweet Kitchen: Cinnamon Roll Tips and Tricks


Yes...they really are just as good as they look. Out of the seven pans that I made...I now only have one in the freezer (and it is already claimed to go to my direct supervisor tomorrow at work - aren't you excited Bonnelle?)

My family has a sweet roll recipe that you will find gracing our brunch plates around the holidays, but at the end of the day I have to admit that the Pioneer Woman's Cinnamon Rolls are my go-to. I won't waste our time by giving you the recipe because she does a great job of showing you picture by picture how to make cinnamon roll magic in your own kitchen (she also shows the picture by picture in her cookbook). I will however give you a couple of my tips and tricks to making these bad boys. After having made them a few times with a few fails, I feel like I know what will truly help to make them turn out better each time.

Rule #1: Accept that they will not turn out perfect and uniform. By acknowledging this on the front end you will have much more fun and flexibility as well as being more satisfied with your results.

Rule #2: When she tells you to let your milk/oil/sugar mixture cool to lukewarm, listen. Don't drop that yeast if your pot is still hot. When in doubt just wait it out.

Rule #3: Please allow time to let your dough refrigerate overnight. The two times I have failed miserably making these rolls I worked with my dough right away. The only results I had were tears, a husband who thought I was crazy, and sticky dough to scrape off the counters. That dough needs a little beauty sleep too!

Rule#4: When ready to work with your dough, if using a surface other than PW's awesome stainless counters take a large cake pan and fill it with ice. Set this on your surface to keep it nice and cool so the dough will be less inclined to stick. Obviously, remove the ice pan when ready to work. I also think using a Silpat mat or large Roulpat mat makes a HUGE difference.

Rule #5: Flour, flour, flour. Make sure that your work surface is saturated in ample flour. This will be messy but totally worth it when it comes time to roll up your rolls. They will be less likely to stick to the surface and roll a little (key word) more uniform.

Rule #6: Buy a couple packs of throw away cake pans for baking your rolls. They will make it so easy to simply freeze a few pans and transport to all your friends and family. I usually get about 7 to 8 pans per recipe.

Rule#7: Really make your icing to taste. I love the coffee flavor so I always add in more. I have also used half the dough for cinnamon rolls with the maple coffee icing and the other half for cranberry orange rolls with cream cheese icing. Gives a little more variety and options in your freezer!

Rule #8: Don't hoard the frozen pans. Share with friends and family with a label to bake at 250 straight from the freezer for 12-15 minutes.

Rule #9: Do not clean your kitchen in the days leading up to baking the rolls. You will have to clean so much when you are done that cleaning earlier in the week would be useless (totally worth it though).
blog signature - 4/2011

Tuesday, May 17, 2011

Deep South Eats: Corn Pudding


Oh, I just want to get out that big ole spoon and scoop this stuff up it is so good. Another great recipe from Confessions of a Kitchen Diva that is so easy that you will be checking your recipe just to make sure you didn't miss anything. I am such a sucker for simplicity. This is wonderful served with any grilled meats or ham slices at Sunday lunch.


Ingredients:
  • 1 package (20 ounces) frozen Southern-style cream corn, thawed (just throw it in your fridge the day before)
  • 2 cups frozen white corn kernels, thawed (same as above)
  • 4 Tablespoons butter, melted
  • 2 teaspoons sugar
  • 2 large eggs, lightly beaten
  • 1 cup milk
  • salt to taste (pretty generously as it needs the salt)
Directions:
  • Preheat oven to 350 degrees Fahrenheit.
  • Combine all ingredients in a medium bowl, mixing well.
  • Pour into a greased (2 quart) baking dish.
  • Bake uncovered 45 minutes until set in the middle.
Original recipe from Confessions of a Kitchen Diva.


blog signature - 4/2011

Monday, May 16, 2011

The Sweet Kitchen: Whats on the Menu?


This week, my menu looks a little different. A dear friend of mine is on bed rest for the next two weeks before she gets to meet her sweet twins! Since I know she is a to-do lister just like me I assumed she didn't get to cook things to stock up her freezer for after the birth. I am taking over this task and adding two or three things to her freezer this week and next. In order to not cook extra I just incorporated these items into our weekly menu.

Monday: Chicken Pot Pies (plus one for the freezer) and Fresh Fruit
Tuesday (Work Night): Spaghetti with Meat Sauce (extra sauce for the freezer) and Garlic Green Beans
Wednesday: Pork Tenderloin, Onion Rice, and Broccoli with Toasted Pecans
Thursday (Work Night): Leftovers/Sandwiches
Friday: Party at friend's house
Saturday: Stuffed Pizza Rolls, Garden Salad, Apple Slices
Sunday: Small Group Meal

Also making some homemade dinner rolls for my freezer and my friend.

What are you making this week?

Giveaway Winner for the Puddle Jumper is.... Andrea Kay. Email me at rreiboldt@gmail.com your mailing address and I will get it in the mail!


blog signature - 4/2011

Friday, May 13, 2011

Deep South Eats: Chocolate Chess Pie


If this pie were on a dating site it would read: dependable, simple, delicious and great in group situations. Seriously, dating a pie would be way less complicated! I always try to have the ingredients for this pie in the pantry and fridge/freezer. That way, if I need to take dinner to someone they can have an awesome dessert, or if a friend has had a bad day, week, month year, you can deliver this chocolaty goodness to brighten their mood.


Ingredients:

  • 1 small can of evaporated milk
  • 2 eggs
  • 3 Tablespoons of cocoa powder (I love to switch it up and use dark chocolate cocoa powder from time to time)
  • 1/2 stick of butter or margarine (do not melt - I will actually allow margarine if absolutely necessary - margarine will hold together better while butter will be a little gooier consistency)
  • 1 1/2 cups of sugar
  • 1 Tablespoon of vanilla extract
  • 1 pie crust (deep dish will help keep the ingredients in the shell instead of on your floor as you transfer it to the oven)
Directions:
  • Preheat oven to 350 degrees F.
  • Mix all ingredients in blender.
  • Pour into an unbaked pie shell (you don't even have to thaw the shell)
  • Bake for 45 minutes. 
This pie is best if made a day ahead and allowed to set. Wonderful with a scoop of vanilla ice cream.

blog signature - 4/2011

What is Your Way Friday: Giveaway Edition


Do you think baking could be added to one of the 5 Love Languages?
I do. After making 7 pans of amazing Cinnamon Rolls from the amazing Pioneer Woman I felt a lot of love. 
So much love that I would love to do a little giveaway today. 

This giveaway applies to moms and families for the most part, but would make a great gift for a kid also.
I am giving away one:

Stearns Kids Puddle Jumper Deluxe Life Jacket, Turtle


My little nut is in love with hers and we think the world of how it gives her confidence and encourages her in building the motions of swimming. Unfortunately I ordered two when ordering one to leave at the beach house. Instead of sending it back I would like to give it away one of my favorites to my readers.

Ways to enter:
1. Leave a comment telling me your favorite summertime activity.
2. Become a follower and leave a comment telling me you are a follower.
3. Become a fan on the facebook page and leave another comment saying you are a fan.

Giveaway ends: Sunday at 8:00pm EST.

I am in no way associated with the makers of Puddle Jumpers. In fact if someone told them I was giving one promoting one of their life jackets they would probably hit the snooze and go back to sleep.


blog signature - 4/2011

Tuesday, May 10, 2011

Deep South Eats: Flank Steak with Herbed Potatoes and Green Beans


Keeping it real with the plastic plate here folks - and the fact that this was a reheated plate of leftovers the day after I made it. This was such a wonderful meal. After cooking it once there are a few things I would change for the next time. Broiling or grilling instead of pan cooking. The hot potatoes and green beans with the dijon vinaigrette dressing were awesome and I probably could have eaten them alone out of a giant bowl (sad but oh so true).

Ingredients:

  • 2 medium Yukon Gold potatoes (my grocer had baby golds that were super tender and bite size)
  • 7 Tablespoons of olive oil
  • 1 flank steak approx 1 1/2 pounds
  • salt and pepper
  • 3 Tablespoons red wine vinegar
  • 1 Tablespoon Dijon mustard
  • 8 ounces green beans, trimmed and cut into 2-inch (bite size) pieces
  • 1 shallot, minced (you can find these usually with the garlic and onion in the grocery)
  • 2 Tablespoons finely chopped fresh parsley (I was making this before work one day so for ease I subbed 1 T dried parsley and 1 t dill)
  • 2 Tablespoons finely chopped fresh dill (see above)
Directions:
  • Pat steak dry with paper towels and season with salt and pepper
  • Combine red wine vinegar and mustard in medium bowl.
  • Slowly whisk in 5 Tablespoons of oil into vinegar-mustard mixture.
  • Coat steak with 2 Tablespoons of vinaigrette and allow to sit covered 30 mins to no longer than 4 hours in refrigerator.
  • When ready to cook, preheat broiler (or grill if going that route).
  • Toss potatoes and 1 Tablespoon of oil in large bowl and wrap tightly with plastic wrap.
  • Microwave until potatoes are translucent, 4 to 7 minutes, shaking bowl (w/ plastic still in place) halfway through. and drain well. Set aside.
  • Broil steak 6 inches from broiler (on a broiler pan or foil-covered, rimmed baking sheet) about 5 minutes per side (for medium rare - the best way to eat flank steak).
  • Set steak aside on cutting board and tent with foil.
  • Heat remaining Tablespoon of oil in skillet and cook potatoes and beans over medium heat until browned and tender, approx 5 minutes.
  • Off heat stir in remaining vinaigrette, shallot, parsley and dill into the potatoes and green beans. Season with salt and pepper.
  • Slice steak thinly against the grain and serve with hot potato and green bean salad.
Recipe adapted from original recipe in my favorite magazine: Cook's Country.
blog signature - 4/2011

Monday, May 9, 2011

The Sweet Kitchen: Whats on the Menu?


Monday: Minute Steaks with Pan Gravy and Presto Mushrooms, Mashed Potatoes, Roasted Broccoli
Tuesday (Work Night): Angel Chicken Pasta, Tossed Salad
Wednesday: Potato Bacon Breakfast Casserole, Fresh Fruit, Cinnamon Rolls
Thursday (Work Night): Leftovers/Sandwiches
Friday: Bourbon Pork Tenderloin Medallions, Dreamy Creamy Grits, Caramelized Green Beans
Saturday: Out to Eat (and to watch the soccer team my brother coaches in their state championship game)
Sunday (Work Night): Leftovers

What I am baking this week:
  • Potato Chip Cookies (leftover potato chips = perfection)
  • Pioneer Woman's Cinnamon Rolls
  • Pretzel Rolls (didn't get to make them last week and want to make for freezing)
As always, what are you eating this week?


blog signature - 4/2011

Friday, May 6, 2011

Bloggers... We're Just Like You

We feel old sometimes...

Standing in line at a local store yesterday, I heard this conversation between two maybe college age girls behind me:

Girl 1: You know those are recipe cards, right?

Girl 2: Yeah, next time I drive down to my parents I am going to transcribe some of my mom's recipes. You know she has them written on really old newspaper from 1983 (the year I was born).

Girl 1: Wow that is really old.

Listen up girlies I am not even in my thirties and you just made me feel like an old maid. I was laughing all the way home and shared more laughs with my mom and friends. They may have made me feel old but I laughed the rest of the day. Who has their recipes written on newspaper anyway?

Check out the Royal Wedding Viewing Party Pictures from yesterday.
blog signature - 4/2011

Thursday, May 5, 2011

Deep South Party: Royal Wedding Viewing

I do apologize that this post has been so late. Me and my computer have been having some words and not the good kind. Something along the lines of editing all the pictures and then realizing that they didn't save right....twice. Not that there was much to do with the photos as 4 am provides optimal lighting for pictures...cough...cough.

This party was so much fun. I am so thankful that my mom put together such a memorable night. I don't think my husband would have understood all the ooohing and ahhhing had we been watching it at home together. A room full of girls though...it was oooohing and ahhhhing in surround sound.

The Decor
Adorable bunting, union jacks, and assorted printables made my mom's house feel festive and exciting.

The Sweets
There were tea muffins, crumpets also called crumblettes on the package (or what my mom thought was trumpets), shortbread cookies in the shape of crowns, cranberry scones, fresh fruit, and a beautiful mini wedding cake that the lady made for nothing (I think she thought we might be a little crazy when we explained what is was for and took pity on us).

The Savory and Satisfying
Assortment of hot tea, champagne punch toast (champagne and cranberry raspberry juice with a raspberry at the bottom), assorted tea sandwiches: cucumber, turkey and with a cran-nut mayo, and ham and swiss.

Our Official Party Pack
Tiara (of course), trivia quiz, broadcast bingo, and an official wedding program.

I wished that there was a royal wedding every few years so that we could have this party over and over. At the end of the day I guess what makes it so special is the rare occurrence.


blog signature - 4/2011