Showing posts with label DIY. Show all posts

Tuesday, May 22, 2012

Deep South DIY: Favorite Applique Sites

I bought my first embroidery machine last fall as a birthday-anniversary-Christmas present.
I had been sewing for many years and was ready to add to my skills.
In all honesty, my machine sat for awhile with very little use as I was intimidated as can be.
I started with small embroidery projects and questioned the ears off of others I knew with embroidery expertise.

I quickly learned that embroidery wasn't as much my niche as applique.
I came across some wonderful tutorials thanks to Rosemary at Applique Cafe.
She gave me the complete confidence to step out and give it a go and I have since fallen in love!

I am in the process of developing a small business with a hopeful launch of mid-July.
It is such an exciting and scary time for me, but I have really found a passion.
I hope if any of you readers are nervous to jump into applique you will email me and let me give you the confidence for applique.

I have not had the chance to test designs from all of my favorite sites but I will say they are very talented digitizers. I had the opportunity to meet many of them face-to-face at the Everything Applique Conference.
Being able to meet them made me love their work even more!


Applique Cafe
 Anchor


I also love but haven't sampled...
Planet Applique (thanks to Alicia for introducing me)
and I am in love with these hooded towel sets from Applique Corner.

What are some things you have DIY'ed lately?

Ever have questions or want to request a recipe or tutorial, comment or email me at deepsouthsweets@gmail.com. You can also visit Deep South Sweets on Facebook or follow me on Pinterest!

blog signature - 4/2011

Wednesday, April 25, 2012

Deep South DIY: Pinafore Dress and Bloomers

There is nothing I love more than sewing for my sweet girl.
It is truly a hobby that ignites my creativity!

I love the patterns over at Sew Sweet Patterns and was itching to try the Mayah Pinafore and Bloomers.
I found the perfect fabrics at Hobby Lobby to coordinate the reversible pinafore.
On the more "plain" side of the pinafore, I added a hot pink three letter monogram and matching buttons.

For my first reversible outfit, I am very pleased.
I learned a lot and cannot wait to make a few more!


What are you creating lately or inspired to create?

Ever have questions or want to request a recipe or tutorial, comment or email me at deepsouthsweets@gmail.com. You can also visit Deep South Sweets on Facebook or follow me on Pinterest!
blog signature - 4/2011

Wednesday, March 14, 2012

Deep South DIY: Recent Sewing Projects March 2012

In the last few weeks, I have been in the sewing mood.
I love knocking out some projects and trying new things.
Thankfully, I have had some occasions that provided fantastic sewing opportunities.

Super cute "Love Bug" shirt for my daughter's Valentine party.

I made this adorable onesie dress for a friend awhile back. 

Sweet Kate can finally fit and it is adorable.


Anchor T-Shirt and Easy Fit Pants for my nephew's birthday.
I have to say these Easy Fit Pants were one of the very best pants tutorials I have used.
Pants Tutorial: Scientific Seamstress

A sweet newborn gown for a friend's baby shower.
Sweet boy is yet to be named so no monogramming yet...boo!

I have the most precious project in the works right now, but since it is a gift you will have to wait to see it until next week.

I am attending an Applique Conference in April with the hope of being inspired and encouraged to start my own small business!


What are you creating lately or inspired to create?
blog signature - 4/2011

Friday, January 13, 2012

Deep South Home: Sewing Room Update

I was hoping to have more to share with you today but...
My fabrics still have not shipped and...
I managed to do this little number when putting together the 1st of 3 desks:

I am just going to say I am thankful for Band-Aid Advanced Blister Healing.

So.... while we wait for my hand to heal and courage to use the power drill (w/ screwdriver),
I will give you a run down of the plans.

My sewing room is actually a portion of our closet.
Our closet is a long square with a wall down the middle creating two separate rectangles.
I am sure it is meant for his and hers closets or closet and work out space.
We have decided to make the larger half of the rectangle our closet and the smaller half my sewing/craft space.
This is how I am planning to structure the space.
I really wish I had taken a before picture so that I could show how much I am improving the functionality of the space.

Since you can actually see the craft space/closet from our master bathroom I decided to incorporate our master color palette into the sewing room.
Our master is a calming taupe with brick red, ice blue, and chocolate brown accents.
I am going to punch up the colors a bit in the sewing room and add in a complimentary accent color.
I am using a taupey-grey, lipstick red, aqua, and apple green. While softening everything with the same taupe walls and off-white/birch furniture.

Fabrics:

From Left to Right

Idea for Window Treatments:
I love the clean lines and bold look of this window treatment. Of course, I will resist my Southern urges and leave off the monogram. 
Source: Hi Sugarplum!


Ideas for Wall Art


Ideas for the Peg Board Wall

Use peg board for hanging my scissors, large rulers, ribbon, tulle, twine, gift bags, baskets for cards, and so much more. I love the idea of painting the peg board a fun color to add brightness to the room.


I bought $1.99 trash bag holders from IKEA and will use them to hold my wrapping paper thanks to a great pin.

To-Do List:
  • Purchase 3 work tables from Ikea at $33.99 each (dimensions 47ish" x 23ish" giving a total length of 141" or close to 12' of workspace)
  • Assemble tables and arrange sewing/embroidery machines
  • Paint armoire for storing fabric (probably the taupey-grey in the fabric because I don't want a bright color to distract from my stock of sewing fabrics)
  • Recover lamp shades
  • Cover magnet boards and hang
  • Make window treatments
  • Hang peg board
  • Clean out and organize "gear"
  • Make a chair cushion
  • Order fabric
  • Hire electrician to install outlets (yeah having to run an extension cord these days one machine at a time)
What projects are you planning on knocking out these days and what are your thoughts on my sewing room update?

Ever have questions or want to request a recipe or tutorial, comment or email me at deepsouthsweets@gmail.com. You can also visit Deep South Sweets on Facebook or follow me on Pinterest!


blog signature - 4/2011

Friday, December 2, 2011

Deep South DIY: The Allie Dress

I have been "sewing" for about 3 years.
I have kept to mostly simple, straight-line sewing, but recently have been ready to expand my horizons to more complex products.


I found this adorable pattern for The Allie Dress over at Sew Sweet Patterns and couldn't wait to try it out!
I had an adorable purple and white polka dot fabric that needed to be used for a little LSU victory dress for my sweet Belle (I know we are a bit crazy here in the South).

It was a very easy pattern to follow and I loved the step-by-step pictures. It probably took a few hours over the course of several nights to complete, but that included lots of stopping to fix my mistakes. I am the typical "learn by doing" kind of person.

* An outtake with Miss Sass*

If you are looking for some beginner sewing patterns, I recommend that you check out Sew Sweet Patterns. 
Note: The people at Sew Sweet Patterns do not know me other than the fact that I buy their patterns. I have no benefit from recommending them to you except the personal satisfaction of knowing you are making precious clothes for your kids!

What are you DIY'ing this week?

Don't forget to enter the GIVEAWAY for Jesus Calling! It ends TONIGHT at 8pm EST. Winner announced tomorrow!

blog signature - 4/2011

Friday, November 18, 2011

Deep South DIY: Bow Tie Bows

Bow Tie Bows are super cute in their simplicity but the options are endless for fun colors and prints. I think of all the bows, they are the easiest and quickest to make. While this is not my favorite tutorial to give you guys because I was rushed, I loved the ease of making these bows.

Supplies Needed:
Ribbon of your choice. Determine length needed: desired size of finished bow x 2 plus 1 inch.
(For example: I wanted a 4-inch finished bow so I used 9 inches of ribbon)
Hair salon clip
Needle and thread
Lighter
Hair clip
Hot glue gun (not pictured)

Begin by finishing the ends of your ribbon using a lighter or other heat sealing device to prevent your ribbon from fraying.

Fold ribbon in half and use your finger nail or other edge to crease the half way point.

Double ends of ribbon over a half inch to create loop as shown. (I brought the bottom edge out a little just so you could see they are double over)

Bring the half way mark up to your doubled edges as shown.

Slide hair salon clip in to hold in place.

Thread your needle and tie a knot at the ends. Bring your needle through the center of your ribbon in the center of the hair clip. Pull through and trim your ends under the knot in your thread.

Loop the thread around the ribbon through the openings in the hair clip a few times.

Pull thread tightly while pinching an accordion style crease in the center of your bow.

Bring your needle through the center of the bow several times and then cut the threads and tie off in a knot to hold center of bow in place.

Measure your accent ribbon around the center of your bow to decide how much you will need. Trim and finish edges using your lighter or heat sealing device.

Using your hot glue gun, glue one edge of your accent ribbon to the back of the center of the bow.

Bring the accent ribbon around and adhere the other edge to the back of the center of you bow using your hot glue gun.

Attach your hair clip using your hot glue gun. If your hair clip has open prongs, you will need to place a piece of folded wax paper in between the prongs to prevent the clip from sticking together.

And try it on...nothing is more fun than an adult with a bow in their hair...or just wait for your little nut to get home from school and put it in her hair.

I hope you all are enjoying these tutorials. 

If you ever have a specific tutorial or bow you would like to see, please feel free to comment or email me at deepsouthsweets@gmail.com. You can also visit Deep South Sweets on Facebook or follow me on Pinterest!


Original Tutorial found at The Ribbon Retreat

blog signature - 4/2011

Friday, November 11, 2011

Deep South DIY: Pinwheel Bows

I am so excited to share this bow tutorial with you as Pinwheel Bows are my absolute favorite to make!
I timed myself and this bow took 20 minutes including stopping to take the tutorial pictures, so I know you guys can find the time to complete at least one!

If you missed last week you need to check out the tutorial for Boutique Bows. Remember my new motto...we will never buy a bow again!

My precious Belle sporting her Halloween Pinwheel Bow!

Supplies Needed:
1 yard of 1.5" ribbon (you may use any width or length depending on the size of the bow you desire) 
Lighter or other heat sealing device
Scissors
Ruler
Marking Pen that will bleed through to both sides of the ribbon
Needle and thread
Hair Clip (these may be purchased from any craft store)
Glue Gun

Begin by cutting your ribbon into two sections of 31" and 5". Set aside the 5" for later use. Finish the ends of your 31" of ribbon either with a diagonal or a "v" shape. I think the "v" is very cute for pinwheel bows. Cut desired end and use your lighter or heat sealing device to sear the ends being careful not to burn. I have learned to hard way to do this first as I have ruined a few bows by making my ends when the bow is complete. You can always go back and trim and end a little shorter at the end if necessary.

Measure 3.5" from the right end of your ribbon. Use a marking device that will bleed through to the opposite side of the ribbon to mark the 3.5" mark. Dots are easier for marking as the ribbon does not stay straight easily when making a straight line.

Move the first line to the 6" mark on your ruler and make another line to mark 6" from the first line.
Continue making a mark every 6" until you have a total of 5 marks and around 3.5" left at the left end of your ribbon.

Take your needle and thread and cut about 18-24" of thread and thread your needle. Tie a large double not in the end of your ribbon to help secure your thread.

Starting with the right end of the ribbon, lay the ribbon with the correct side facing up if using a printed ribbon. If you are using a plain ribbon like me, choose one side to be your top and one side to be your bottom. Hand sew your needle across your first marked line on the top of your ribbon. Pull thread through very gently so the ribbon remains flat.

Bring your ribbon under to the right so that you are now looking at the bottom of the ribbon and sew across the second marked line. Pull thread gently through allowing the ribbon to lie flat.

Bring your ribbon across towards the left so that you are now looking at the top of your ribbon and sew across your third marked line. Pull thread through again allowing ribbon to lie flat.

Bring your ribbon under to the right so that you are seeing the bottom of your ribbon and sew across your fourth marked line. Pull thread through again gently allowing ribbon to lie flat.

Bring your ribbon across to the left so that you see the top and sew across your fifth and final marked line. You should now see a zig-zag with the first, third and fifth line showing the top of your ribbon and the second and fourth line showing the bottom of your ribbon.

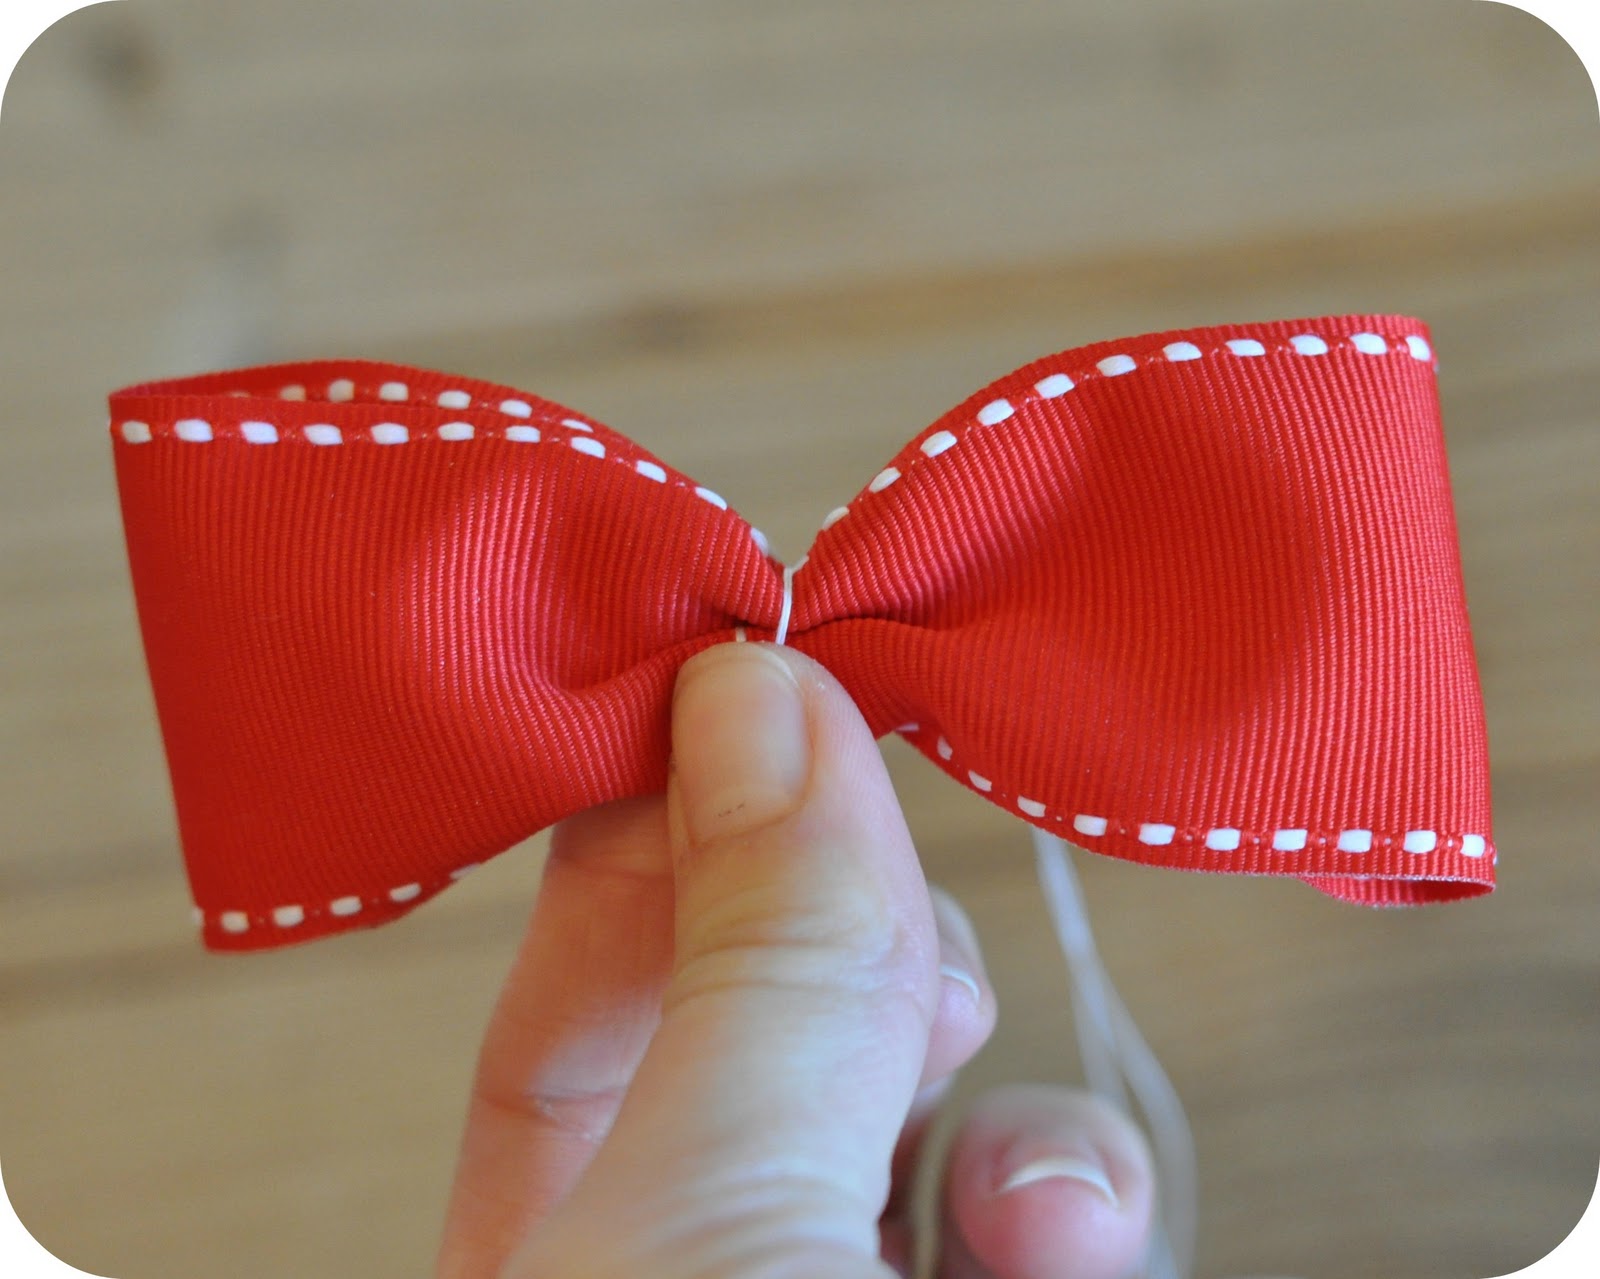
Gently pull your thread cinching your ribbon as you go. Make sure that all your loops are showing the top of your ribbon. Once your ribbon is tight, pinch your bow the center using your non-dominant thumb and forefinger.

Loop your thread around the center a few times. Push your needle through the center from the front of the bow to the back.

Tie your thread in a few knots and then trim your ends.

Using the set aside 5" of ribbon (you can also use an accent color of ribbon if desired) fold it over one third long ways (you know hot dog style).

Fold the other third over the first third and secure both ends with a dot of hot glue.

Tie the folded ribbon to make a knot in the center.

Secure one side of the knotted ribbon to the back of the bow using a dot of hot glue.

Bring the other side around so that the knot is in the center of the front of the bow and secure the other end to the back of the ribbon with a dot of hot glue (you may need to trim the ribbon a little bit to get the right fit).

Attach your hair clip to the back of the ribbon using hot glue. If you hair clip is open on both sides, remember to put a piece of folded parchment or wax paper between the clip to prevent the clip from being glued together.

And there you have a Pinwheel Bow! Trim your ends up if necessary to get them even.

Since my model was at preschool this morning, I graciously stepped in for her....and then almost forgot to take it out of my hair before going to get her from preschool!

Don't forget to check out last week's Boutique Bow Tutorial!

Giving credit to the tutorial that taught me: Notes from the Patch

Ever have questions or want to request a tutorial email me at deepsouthsweets@gmail.com. You can also visit Deep South Sweets on Facebook or follow me on Pinterest!

blog signature - 4/2011